AV HQ Documentation
Everything you need to get the most out of AV HQ.
Getting Started
AV HQ is your complete live production hub for macOS and iOS. Control PTZ cameras, create and monitor livestreams, manage your entire AV network, and run multi-camera shows — all from one app.
The app is designed around a four-stage workflow:
- Control — Connect and position your cameras with precision PTZ controls and presets
- Livestream — Create streams, share watch URLs, push RTMP to your switcher, and monitor analytics
- Network — Discover and visualise all NDI and Dante devices on your network
- Show Mode — View all cameras simultaneously with tally indicators during your live production
System Requirements
| Requirement | Details |
|---|---|
| Operating System | macOS 14 Sonoma or later |
| Processor | Apple Silicon or Intel Mac |
| Network | Wired Ethernet recommended for NDI; Wi-Fi supported |
| NDI SDK | NDI runtime installed (bundled or from ndi.video) |
| Cameras | Any NDI-enabled PTZ camera (PTZOptics, BirdDog, Panasonic, etc.) |
Installation
Download AV HQ from the website or the Mac App Store. Drag the app to your Applications folder and launch it. On first launch, macOS may ask you to confirm you trust the app — click Open to proceed.
First Launch
When you first open AV HQ, the app will automatically begin scanning your local network for NDI sources. Any cameras found will appear in the sidebar on the left. Select a camera to begin controlling it.
Connecting Cameras
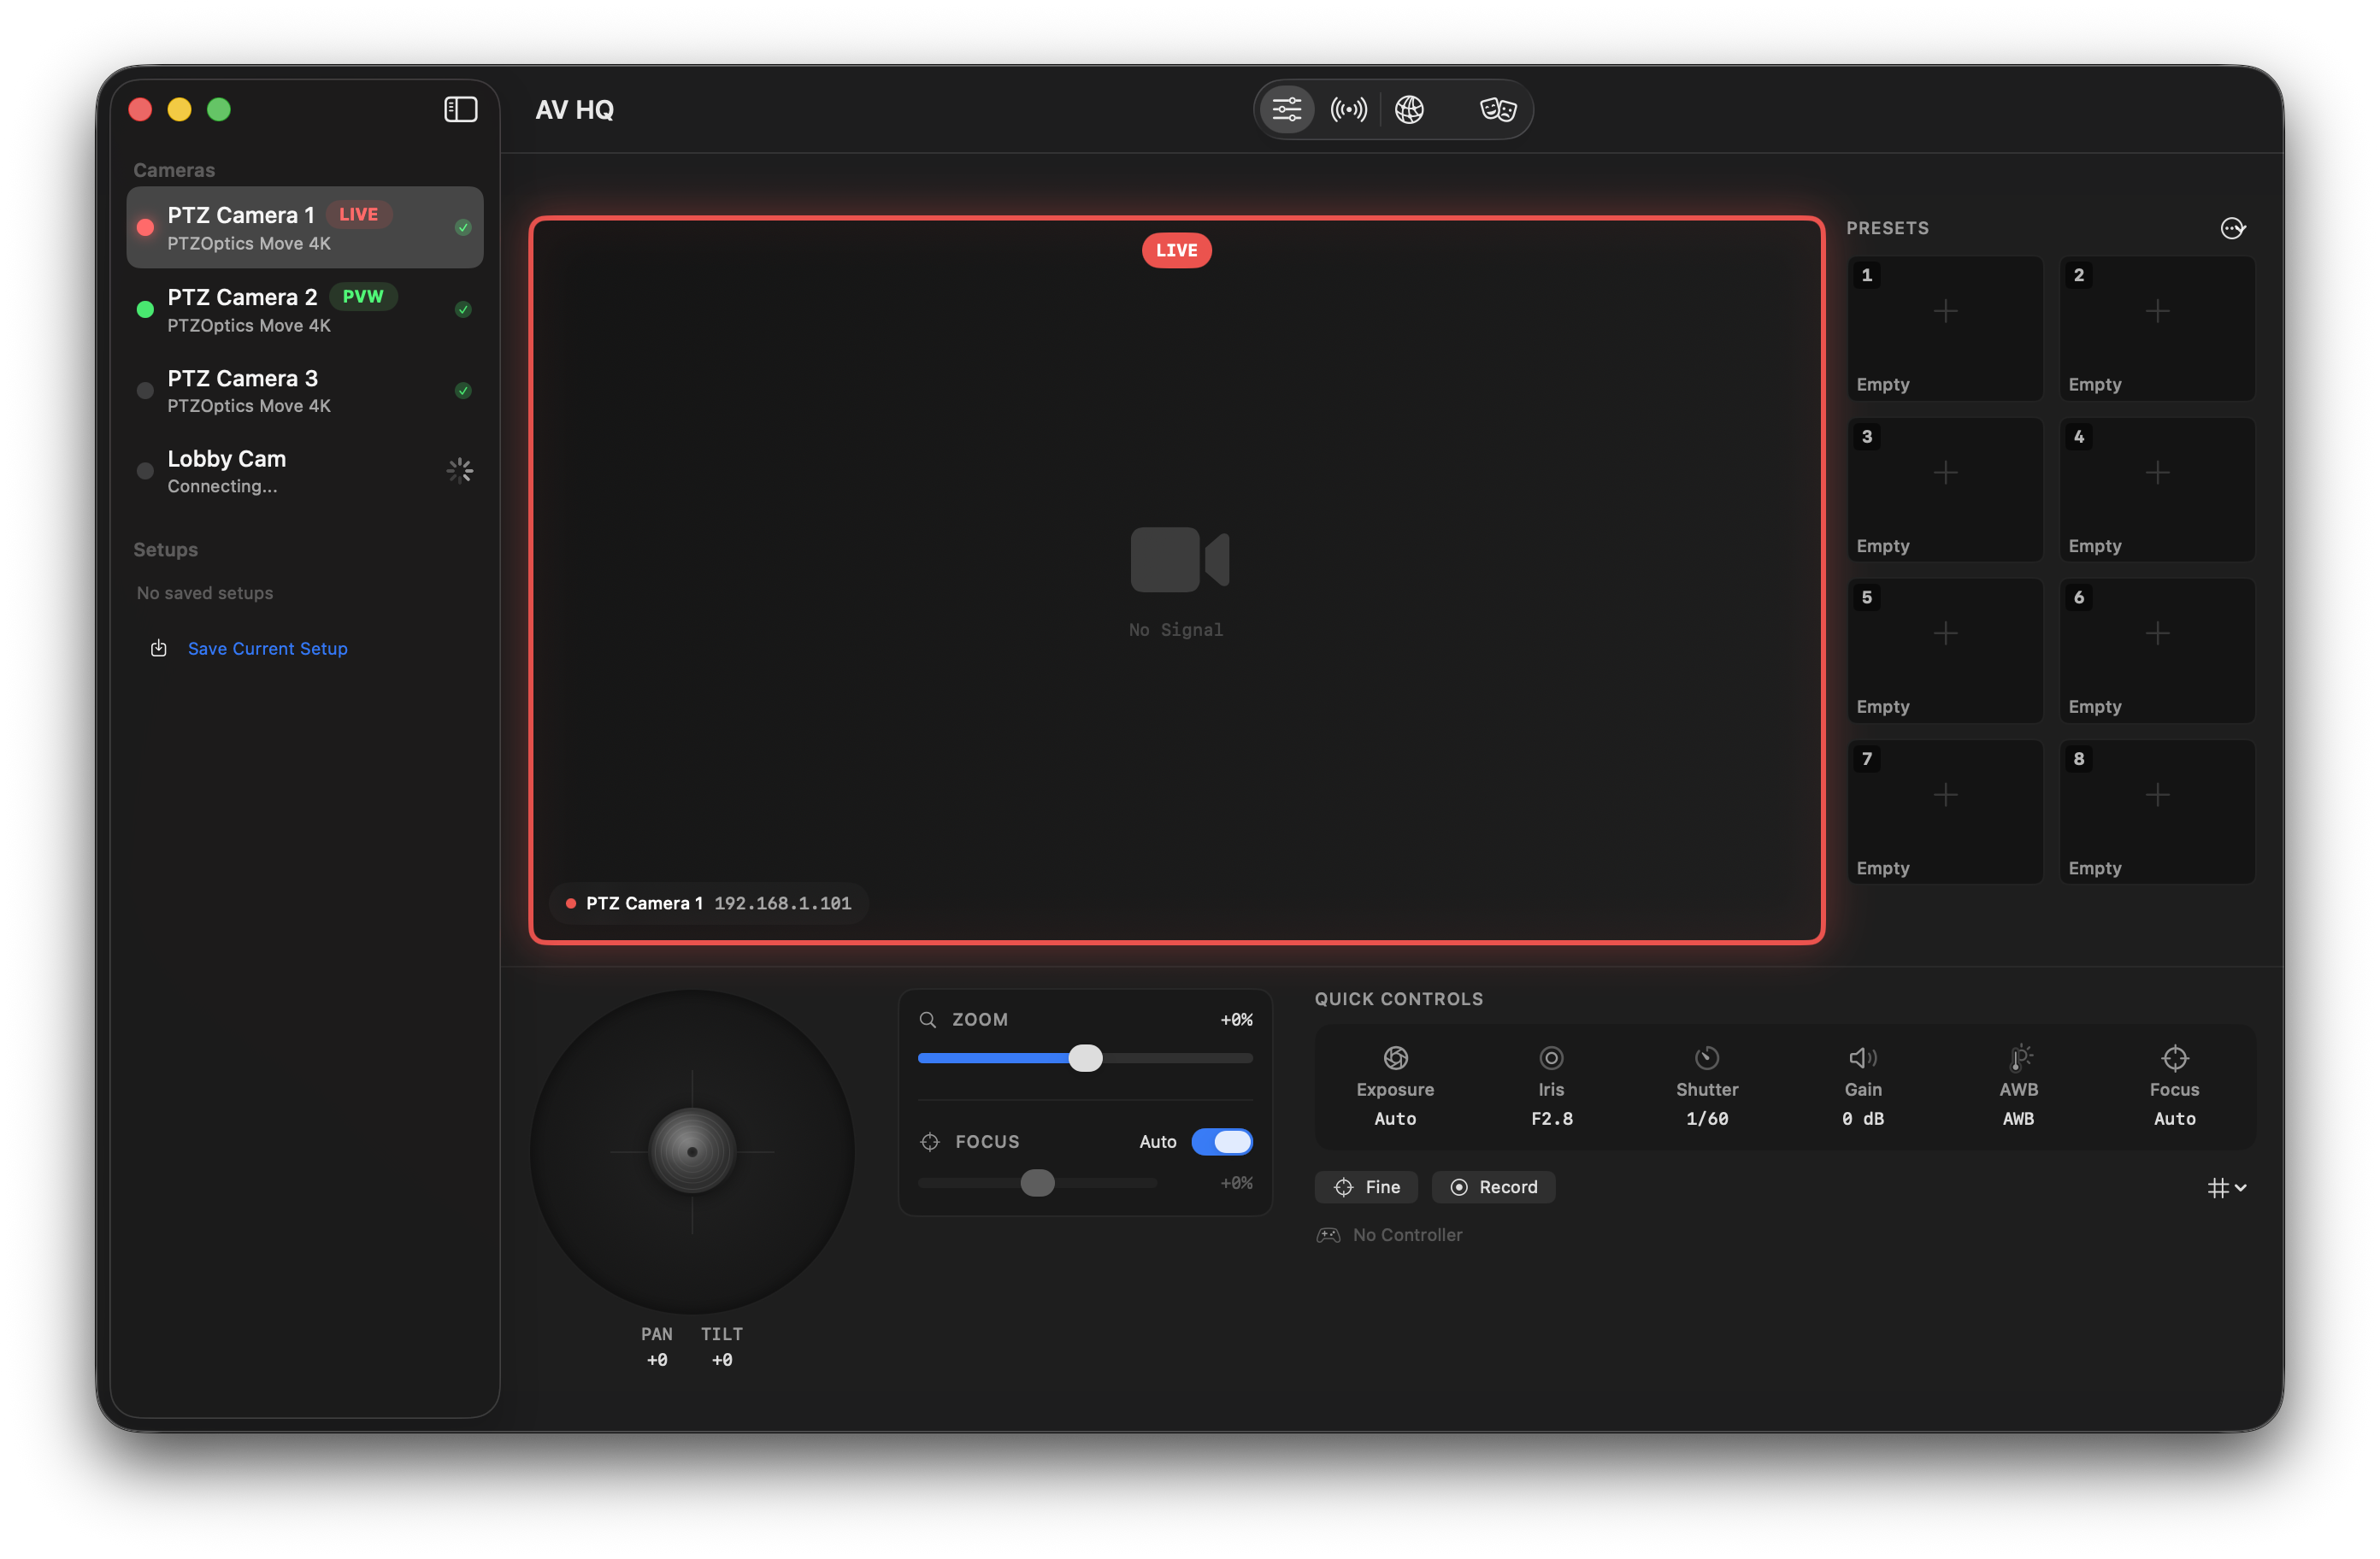
AV HQ automatically discovers NDI cameras on your local network. Cameras appear in the sidebar as they are found, showing their name, connection status, and tally state.
To connect to a camera, simply click on it in the sidebar. The main panel will show the live video preview and control surface for that camera.
PTZ Controls
The control panel provides full pan, tilt, and zoom control for your selected camera:
- Joystick: Click and drag to pan and tilt the camera. The further from centre you drag, the faster the movement. A speed ring around the joystick shows current movement speed.
- Zoom: Use the zoom slider or scroll wheel to zoom in and out. The current zoom level is shown as a numeric readout.
- Focus: Toggle between auto and manual focus. In manual mode, use the focus slider for precise adjustment.
You can also control the camera using keyboard shortcuts:
| Action | Shortcut |
|---|---|
| Pan left | ← |
| Pan right | → |
| Tilt up | ↑ |
| Tilt down | ↓ |
| Zoom in | + |
| Zoom out | - |
| Stop movement | Space |
Fine-Tune Mode
For precise framing adjustments, activate Fine-Tune Mode by pressing F or clicking the Fine button in the controls. This reduces joystick sensitivity by a factor of 10, allowing pixel-perfect positioning.
When active, an amber "FINE" indicator appears on the control panel. Fine mode is remembered per camera, so each camera can have its own setting.
Quick Controls
The Quick Controls strip below the joystick provides one-tap access to the most commonly used camera settings:
- Exposure — Toggle between auto and manual exposure
- Iris — Adjust the aperture (F-stop)
- Shutter — Set the shutter speed
- Gain — Adjust ISO/gain in dB
- AWB — White balance mode and temperature
- Focus — Toggle auto/manual focus
The strip is customisable in Settings. You can rearrange slots and choose which controls to display.
Presets
Save up to 8 camera positions as presets for instant recall during a show. Presets are displayed in a grid to the right of the video preview.
- Save a preset: Position the camera where you want it, then click an empty preset slot (marked with +)
- Recall a preset: Click a saved preset tile to move the camera to that position
- Edit a preset: Right-click a preset tile to rename it, change the recall speed, or delete it
- Recall speed: Each preset can have its own recall speed — slow, medium, fast, or a custom value
A thumbnail is automatically captured when you save a preset, giving you a visual reference for each saved position.
Show Mode
Show Mode is your live production view. It displays all connected cameras in a grid layout with live video previews, tally borders, and quick preset recall — everything you need to run a multi-camera show.
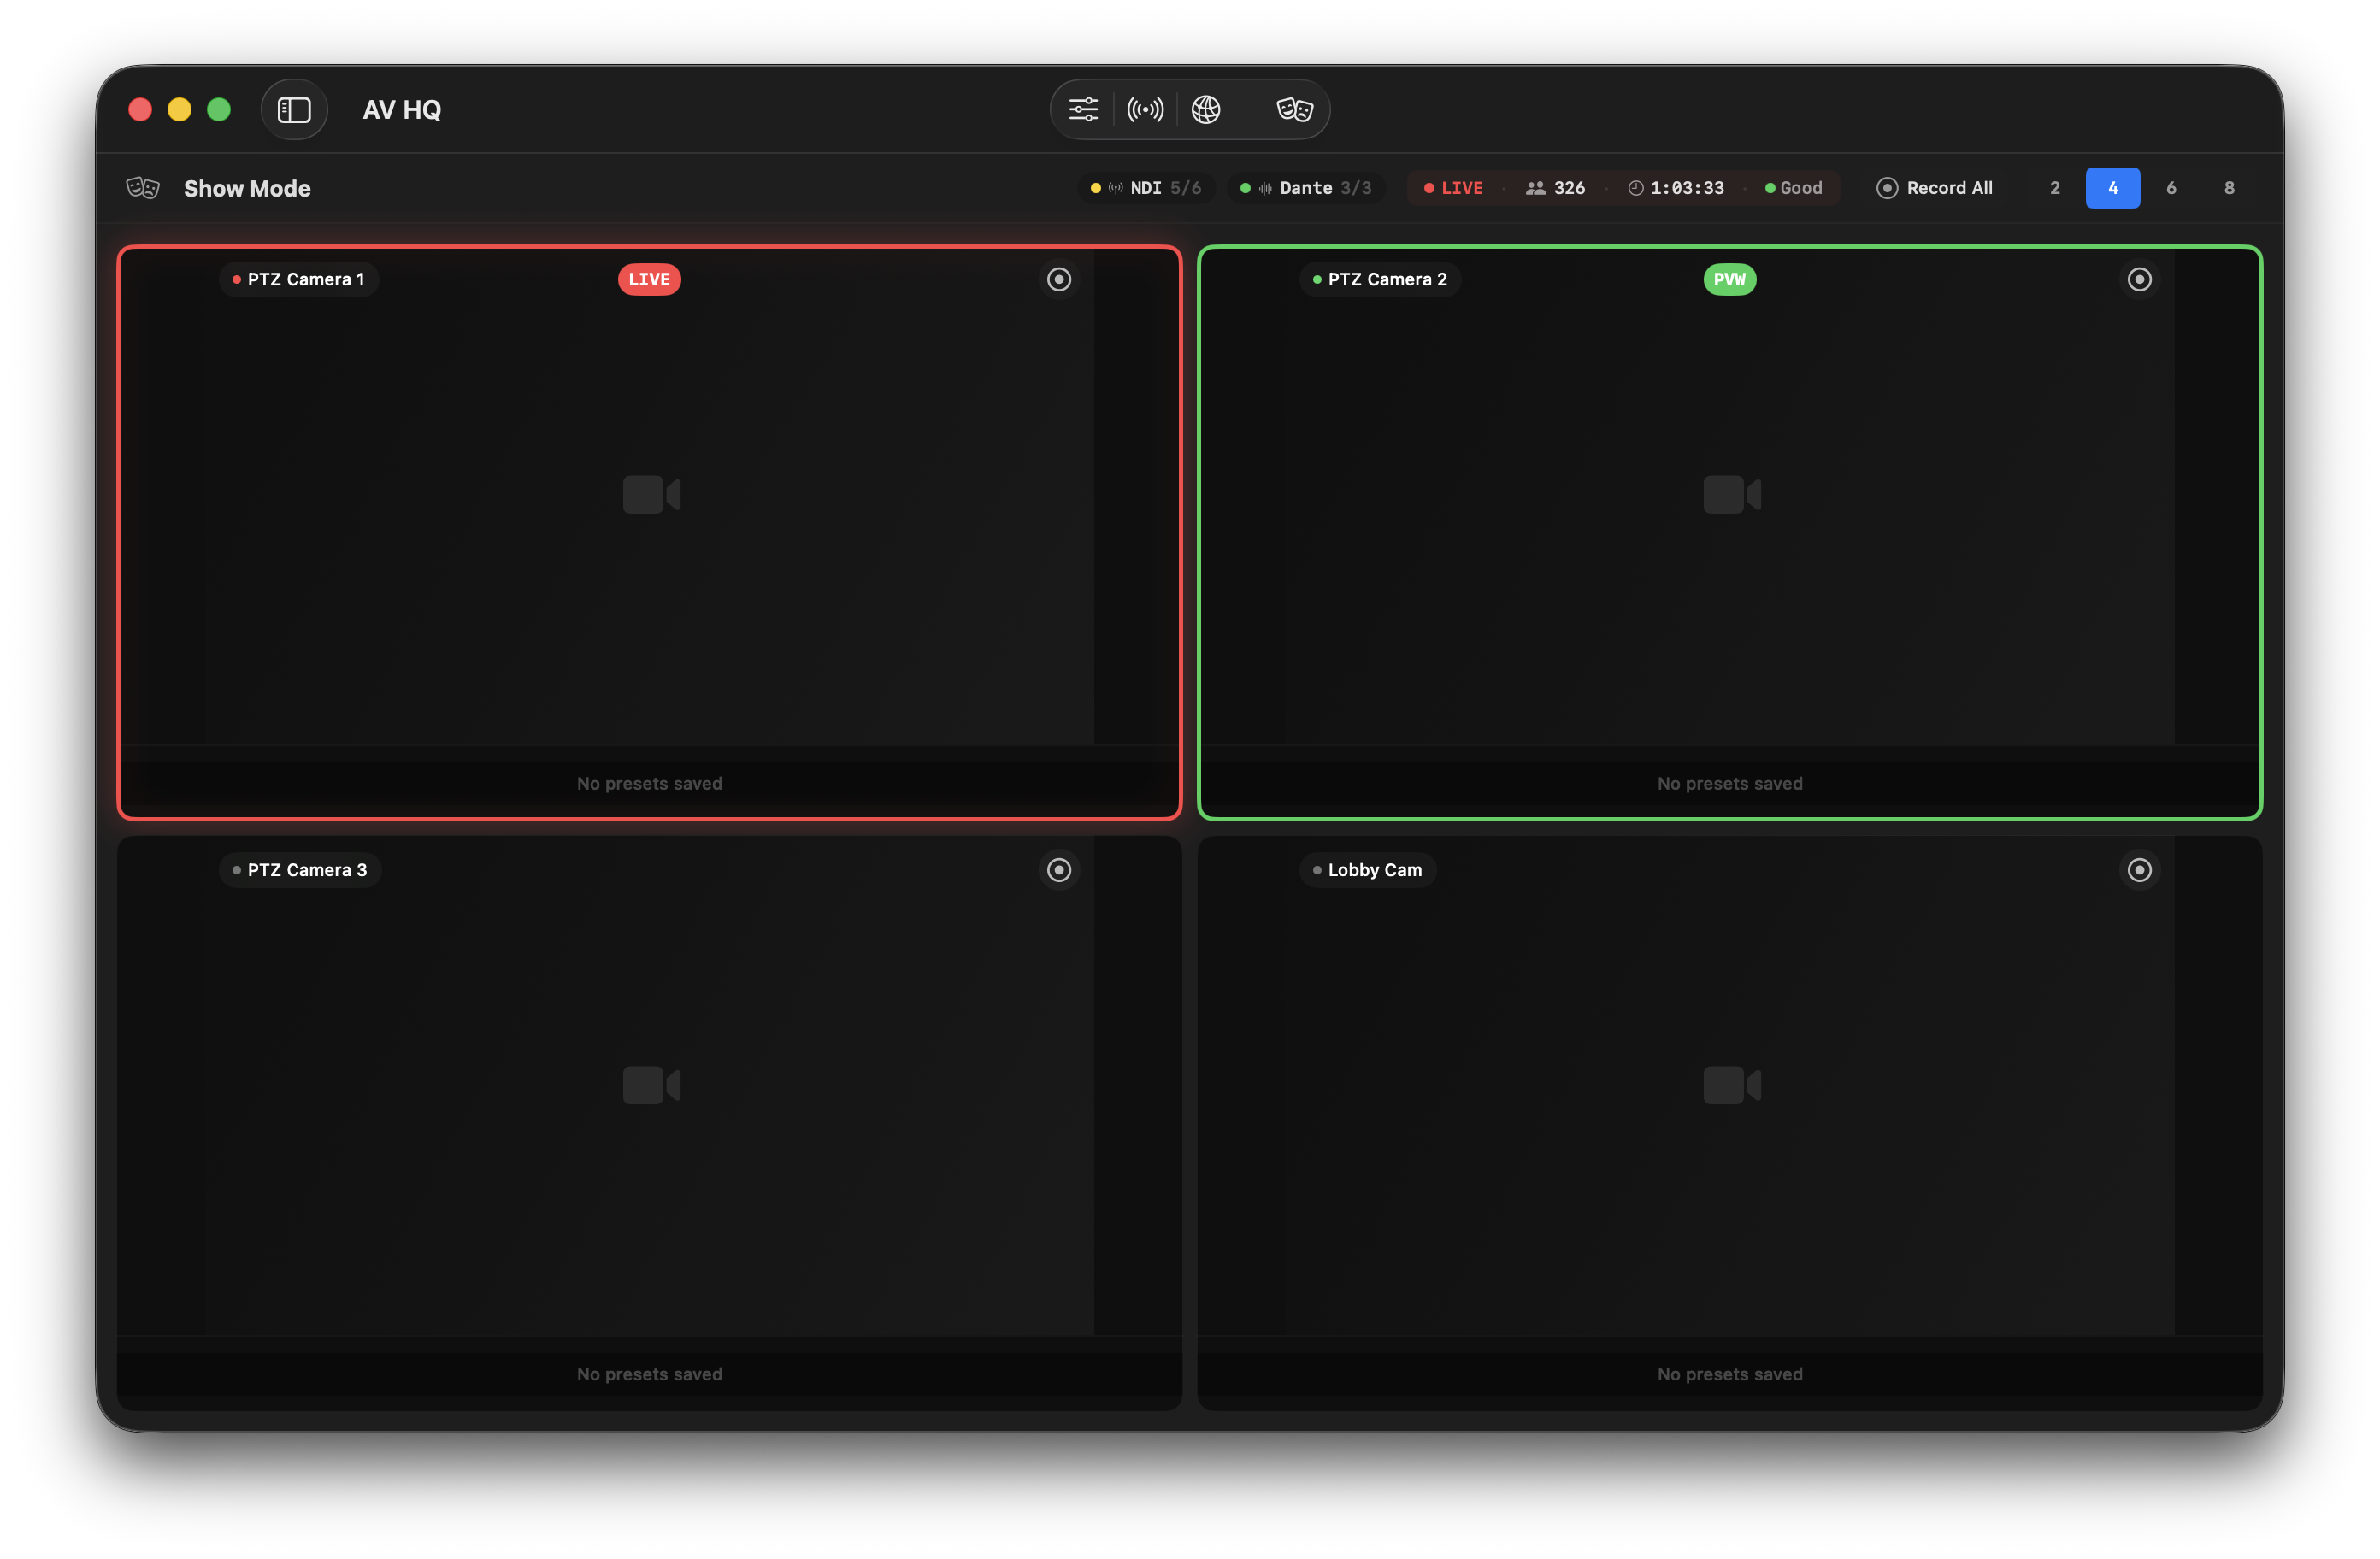
Show Mode includes:
- Multi-camera grid: View 2, 4, or 6 cameras simultaneously
- Layout picker: Switch between 2-up, 4-up, and 6-up layouts using the buttons in the toolbar
- Tally borders: Red border = camera is live (program), green = preview, no border = idle
- Protocol health bar: At-a-glance status of your NDI and Dante networks
- Livestream status: See viewer count, uptime, and stream health without leaving Show Mode
- Preset recall: Each camera panel shows its saved presets for instant recall
- Recording: Record individual cameras or all cameras with one click
Tally Integration
AV HQ receives tally information from production switchers via NDI metadata. This works automatically with:
- vMix
- TriCaster
- Roland SR-20HD (via TCP)
- Any switcher that sends NDI tally metadata
Tally state is shown as a coloured border around each camera tile and as a coloured dot in the sidebar. Red indicates the camera is live on program, green indicates preview.
Recording
Record NDI streams directly within AV HQ. You can record individual cameras or all cameras simultaneously.
- Record All: Click the "Record All" button in the Show Mode toolbar to start recording every camera
- Record Individual: Click the record button on each camera panel
- Session naming: When starting a new recording session, you'll be prompted to name it for easy organisation
- Stop recording: Click the stop button or "Stop All" — you'll be asked to confirm before stopping
Network Overview
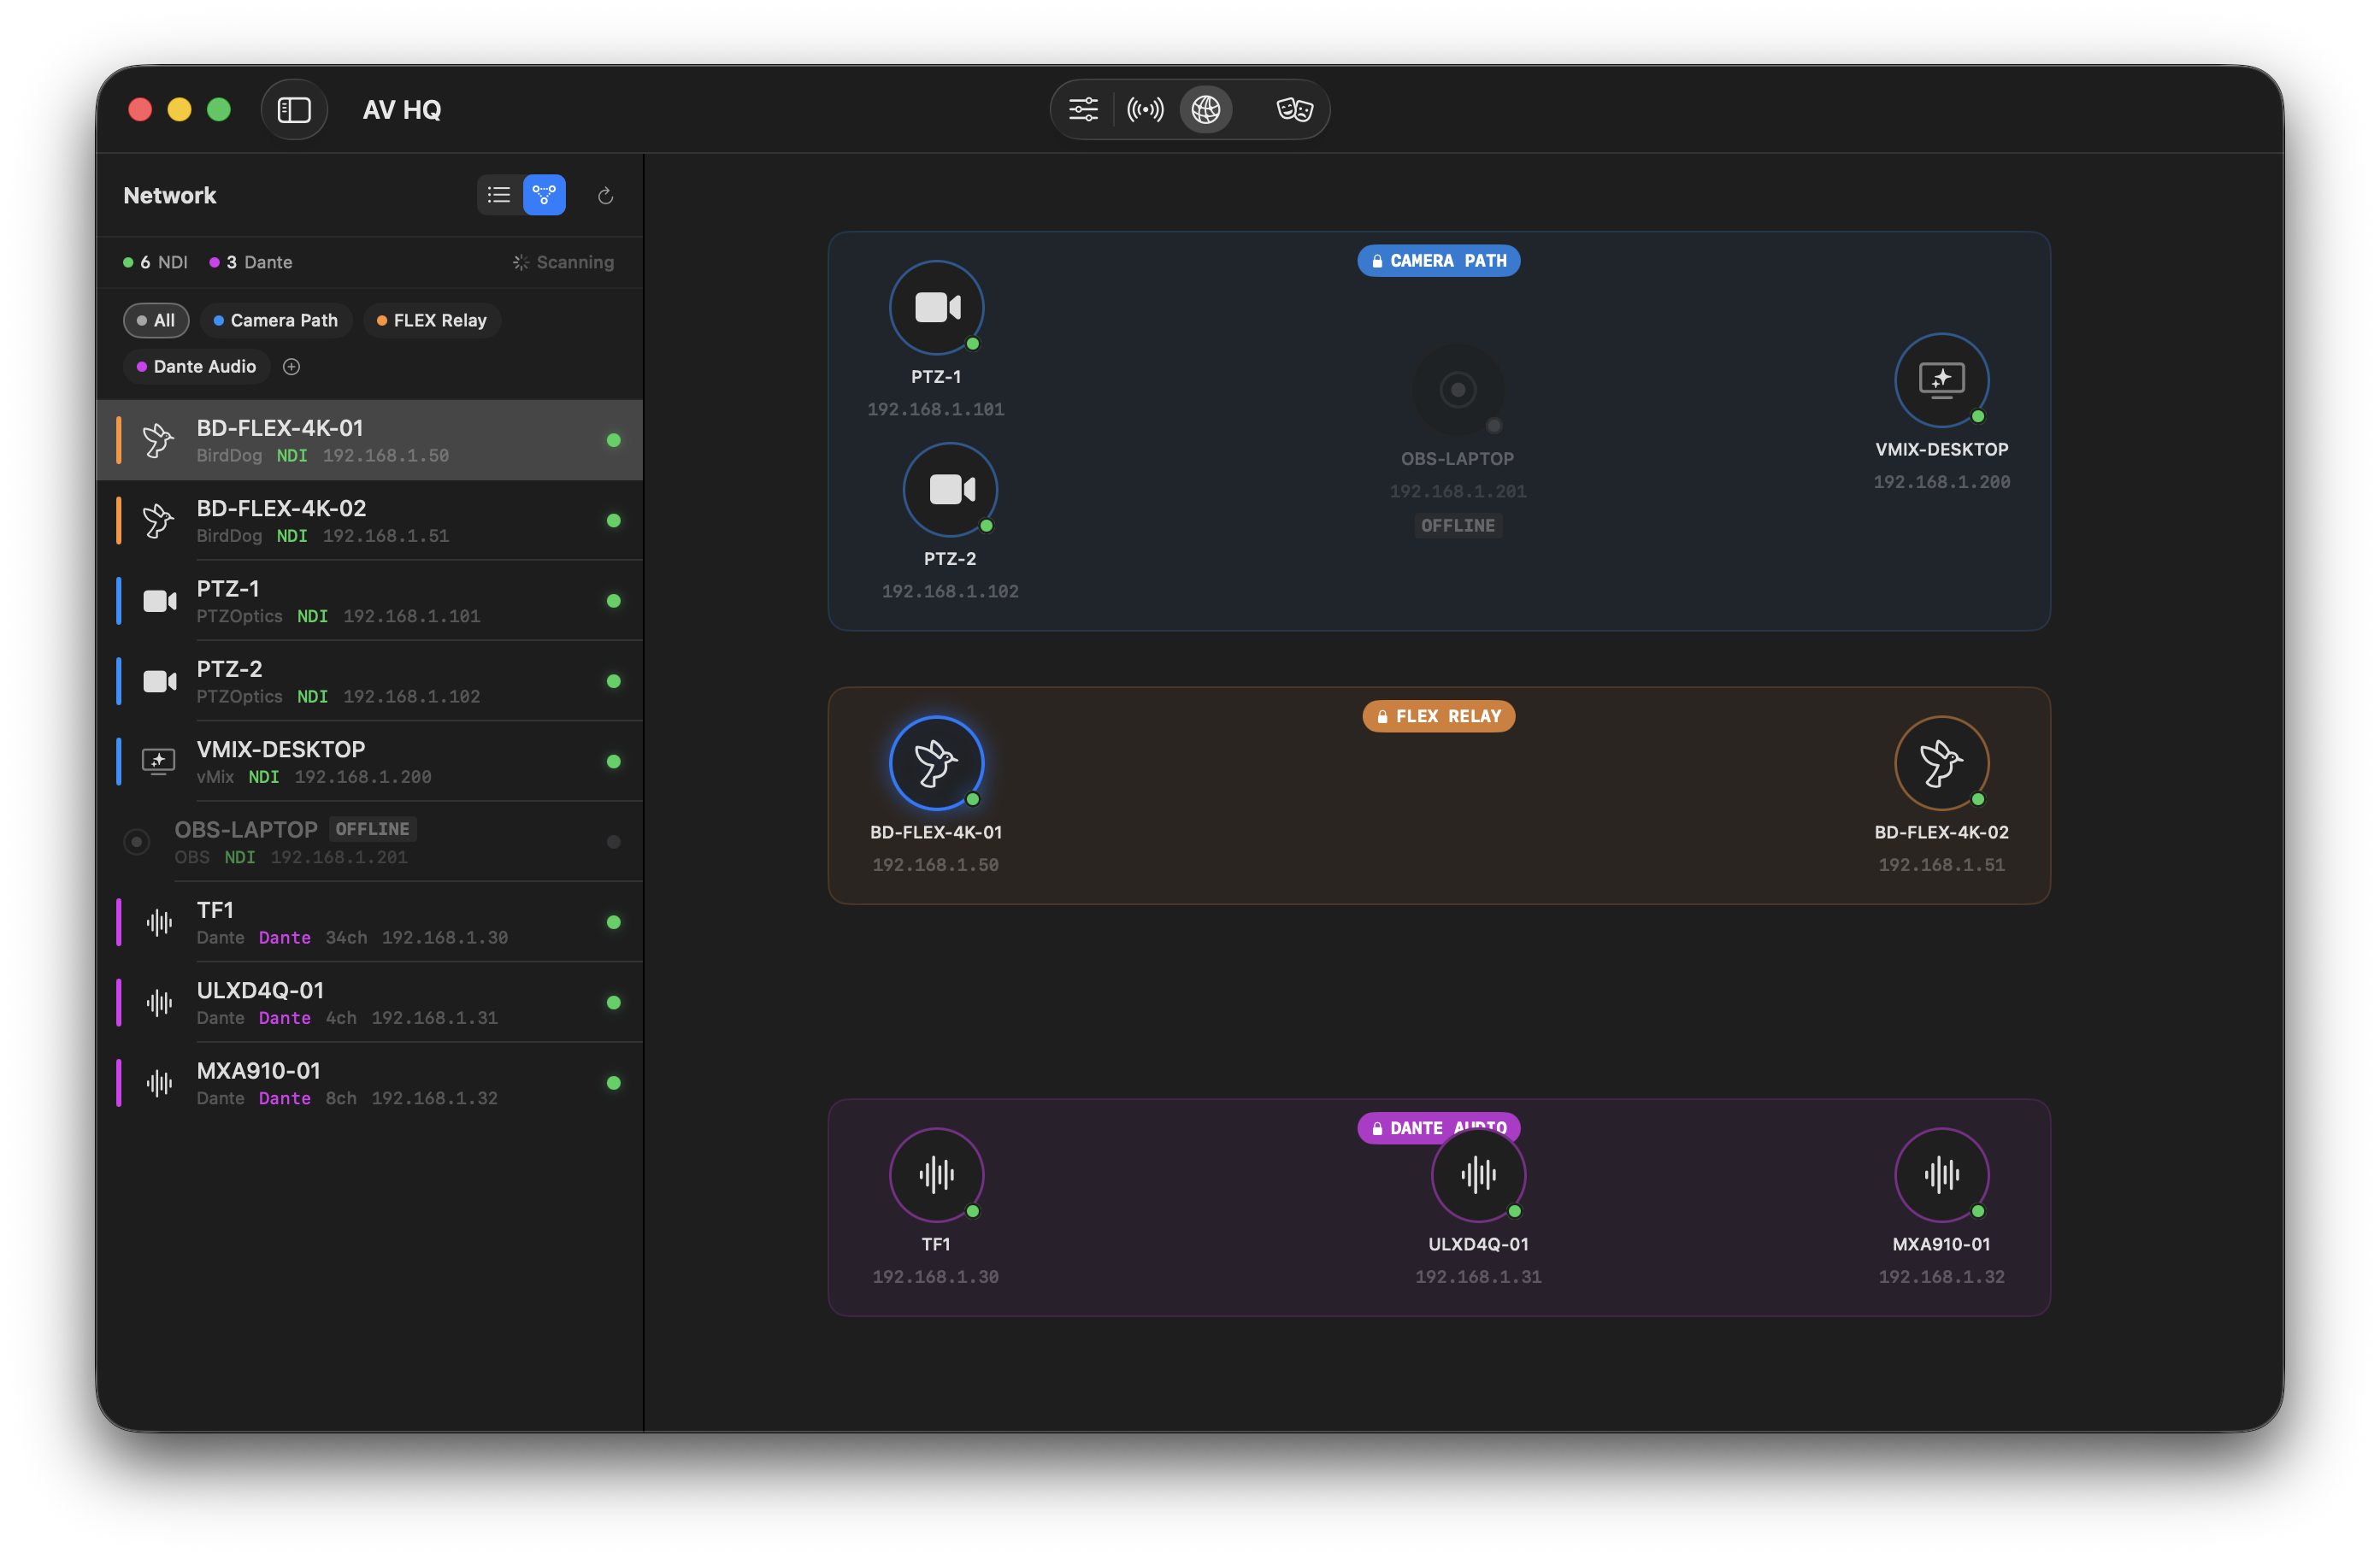
The Network page provides a complete view of all NDI and Dante devices on your local network.
NDI Discovery
AV HQ uses the NDI SDK to automatically discover all NDI sources on your network. This includes cameras, production software (vMix, OBS), replay systems, and any other NDI-enabled device. Devices appear in the list view with their name, IP address, and online status.
Dante Discovery
Dante audio devices are discovered automatically via mDNS (Bonjour). AV HQ browses for Dante services on your network and shows discovered devices with their channel count and online status. This covers mixing consoles, wireless microphone receivers, stage boxes, and ceiling microphones.
Topology View
Switch to the topology view to see your devices arranged visually on a canvas. This gives you an at-a-glance picture of your entire production network.
- Drag to arrange: Click and drag any device node to reposition it. Snap guides appear to help you align devices neatly.
- Sub-system groups: Devices can be organised into named groups (e.g. "Camera Path", "Dante Audio"). Groups are shown with a coloured background.
- Lock groups: Right-click a device in a group and select "Lock" to lock the group. Once locked, dragging any device in the group moves all devices together, making it easy to rearrange your layout without breaking groups apart.
- Device details: Click a device to see its full details, or right-click for a context menu with options to view details, open the web interface, or manage group locking.
Livestream Setup
AV HQ can connect to your streaming platform to show real-time analytics alongside your camera controls. Currently supported platforms:
- Mux: Enter your Mux API token and live stream ID in Settings. AV HQ will fetch real-time metrics from the Mux Data API.
- YouTube: Connect your YouTube account to monitor YouTube Live streams.
Creating Streams
AV HQ can create new Mux livestreams directly from within the app — no need to visit a separate dashboard. Click the New Stream button in the Livestream tab header to get started.
The stream creation sheet lets you:
- Set a title and URL slug: Give your stream a name and a URL-friendly slug (auto-generated from the title, or customise it yourself)
- Private streams: Toggle private mode and set a passcode for restricted access
- Instant RTMP credentials: Once created, you'll see the RTMP server URL and stream key ready to copy into OBS, vMix, or any encoder
- Shareable watch URL: A public watch page is generated immediately — share it with your client or audience even weeks before the event
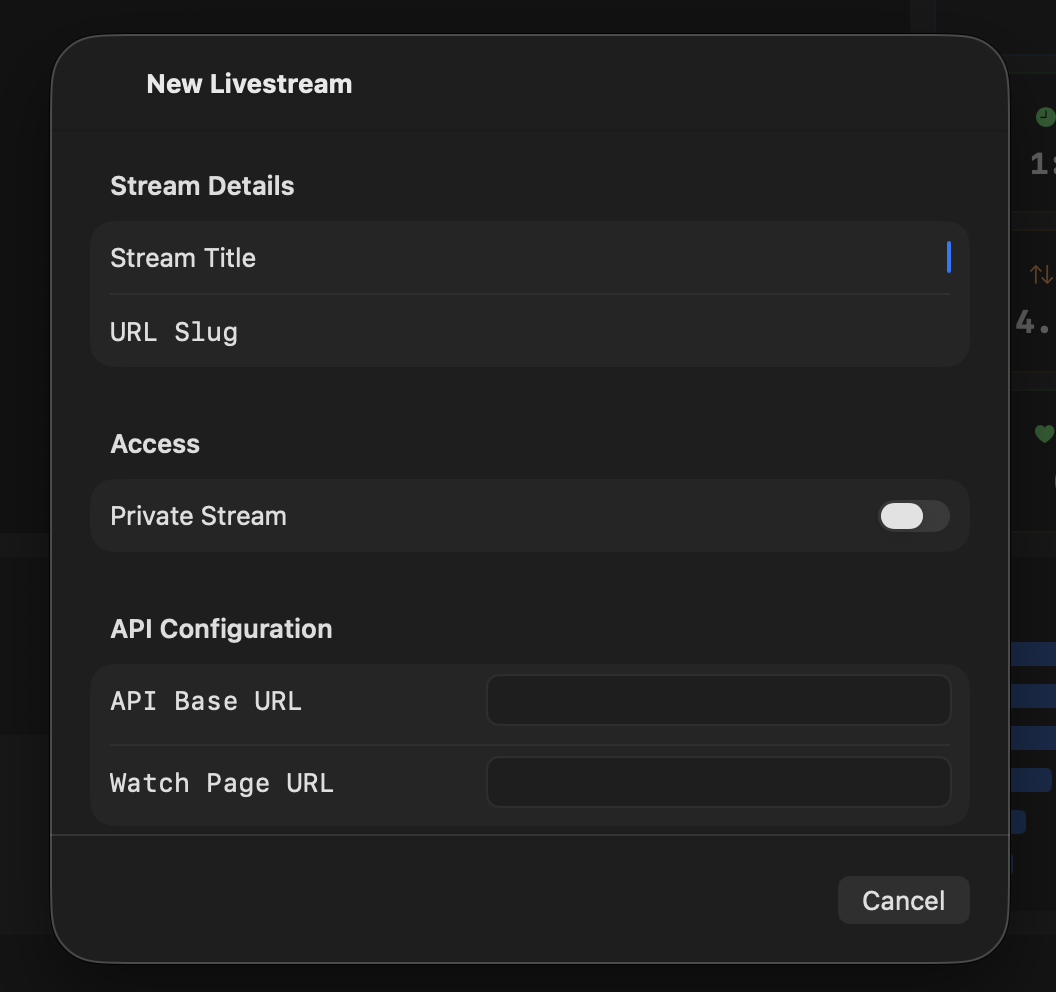
To use this feature, you'll need to configure your API base URL in the stream creation sheet (shown automatically if not yet set). This is the URL of your streaming platform backend (e.g. https://watch.matrix.productions).
My Streams

Every stream you create is automatically saved to a persistent My Streams list in the Livestream tab. This list persists across app launches, so you can:
- Create in advance: Set up streams days or weeks before the event
- Share watch URLs: Come back later and copy the watch URL to send to clients
- View RTMP details on-site: Expand any stream to see the RTMP server and stream key when you're setting up on event day
- Start monitoring: Tap "Monitor" on any saved stream to instantly begin tracking its live analytics
- Push to Roland: Send RTMP credentials directly to your Roland switcher from the expanded stream details
Each stream in the list shows its title, slug, and when it was created. Click the chevron to expand and see full RTMP details, or right-click for quick actions (copy URL, copy stream key, start monitoring, or remove from list).
Roland RTMP Push
If you use a Roland SR-20HD (or compatible V-series) video switcher for streaming, AV HQ can push RTMP credentials directly to the switcher — no need to manually enter them via the Roland's web interface.
This works in two places:
- After creating a stream: The stream result view includes a "Push to Roland" button that sends the RTMP URL and stream key to your connected switcher
- From My Streams: Expand any saved stream and click "Push to Roland" to send the credentials on-site
AV HQ uses two methods to push the configuration:
- HTTP API: Posts to the switcher's built-in web server (primary method)
- RCS TCP commands: Falls back to sending RCS protocol commands over the existing tally connection
Livestream Monitoring
Once configured, the Livestream page shows:
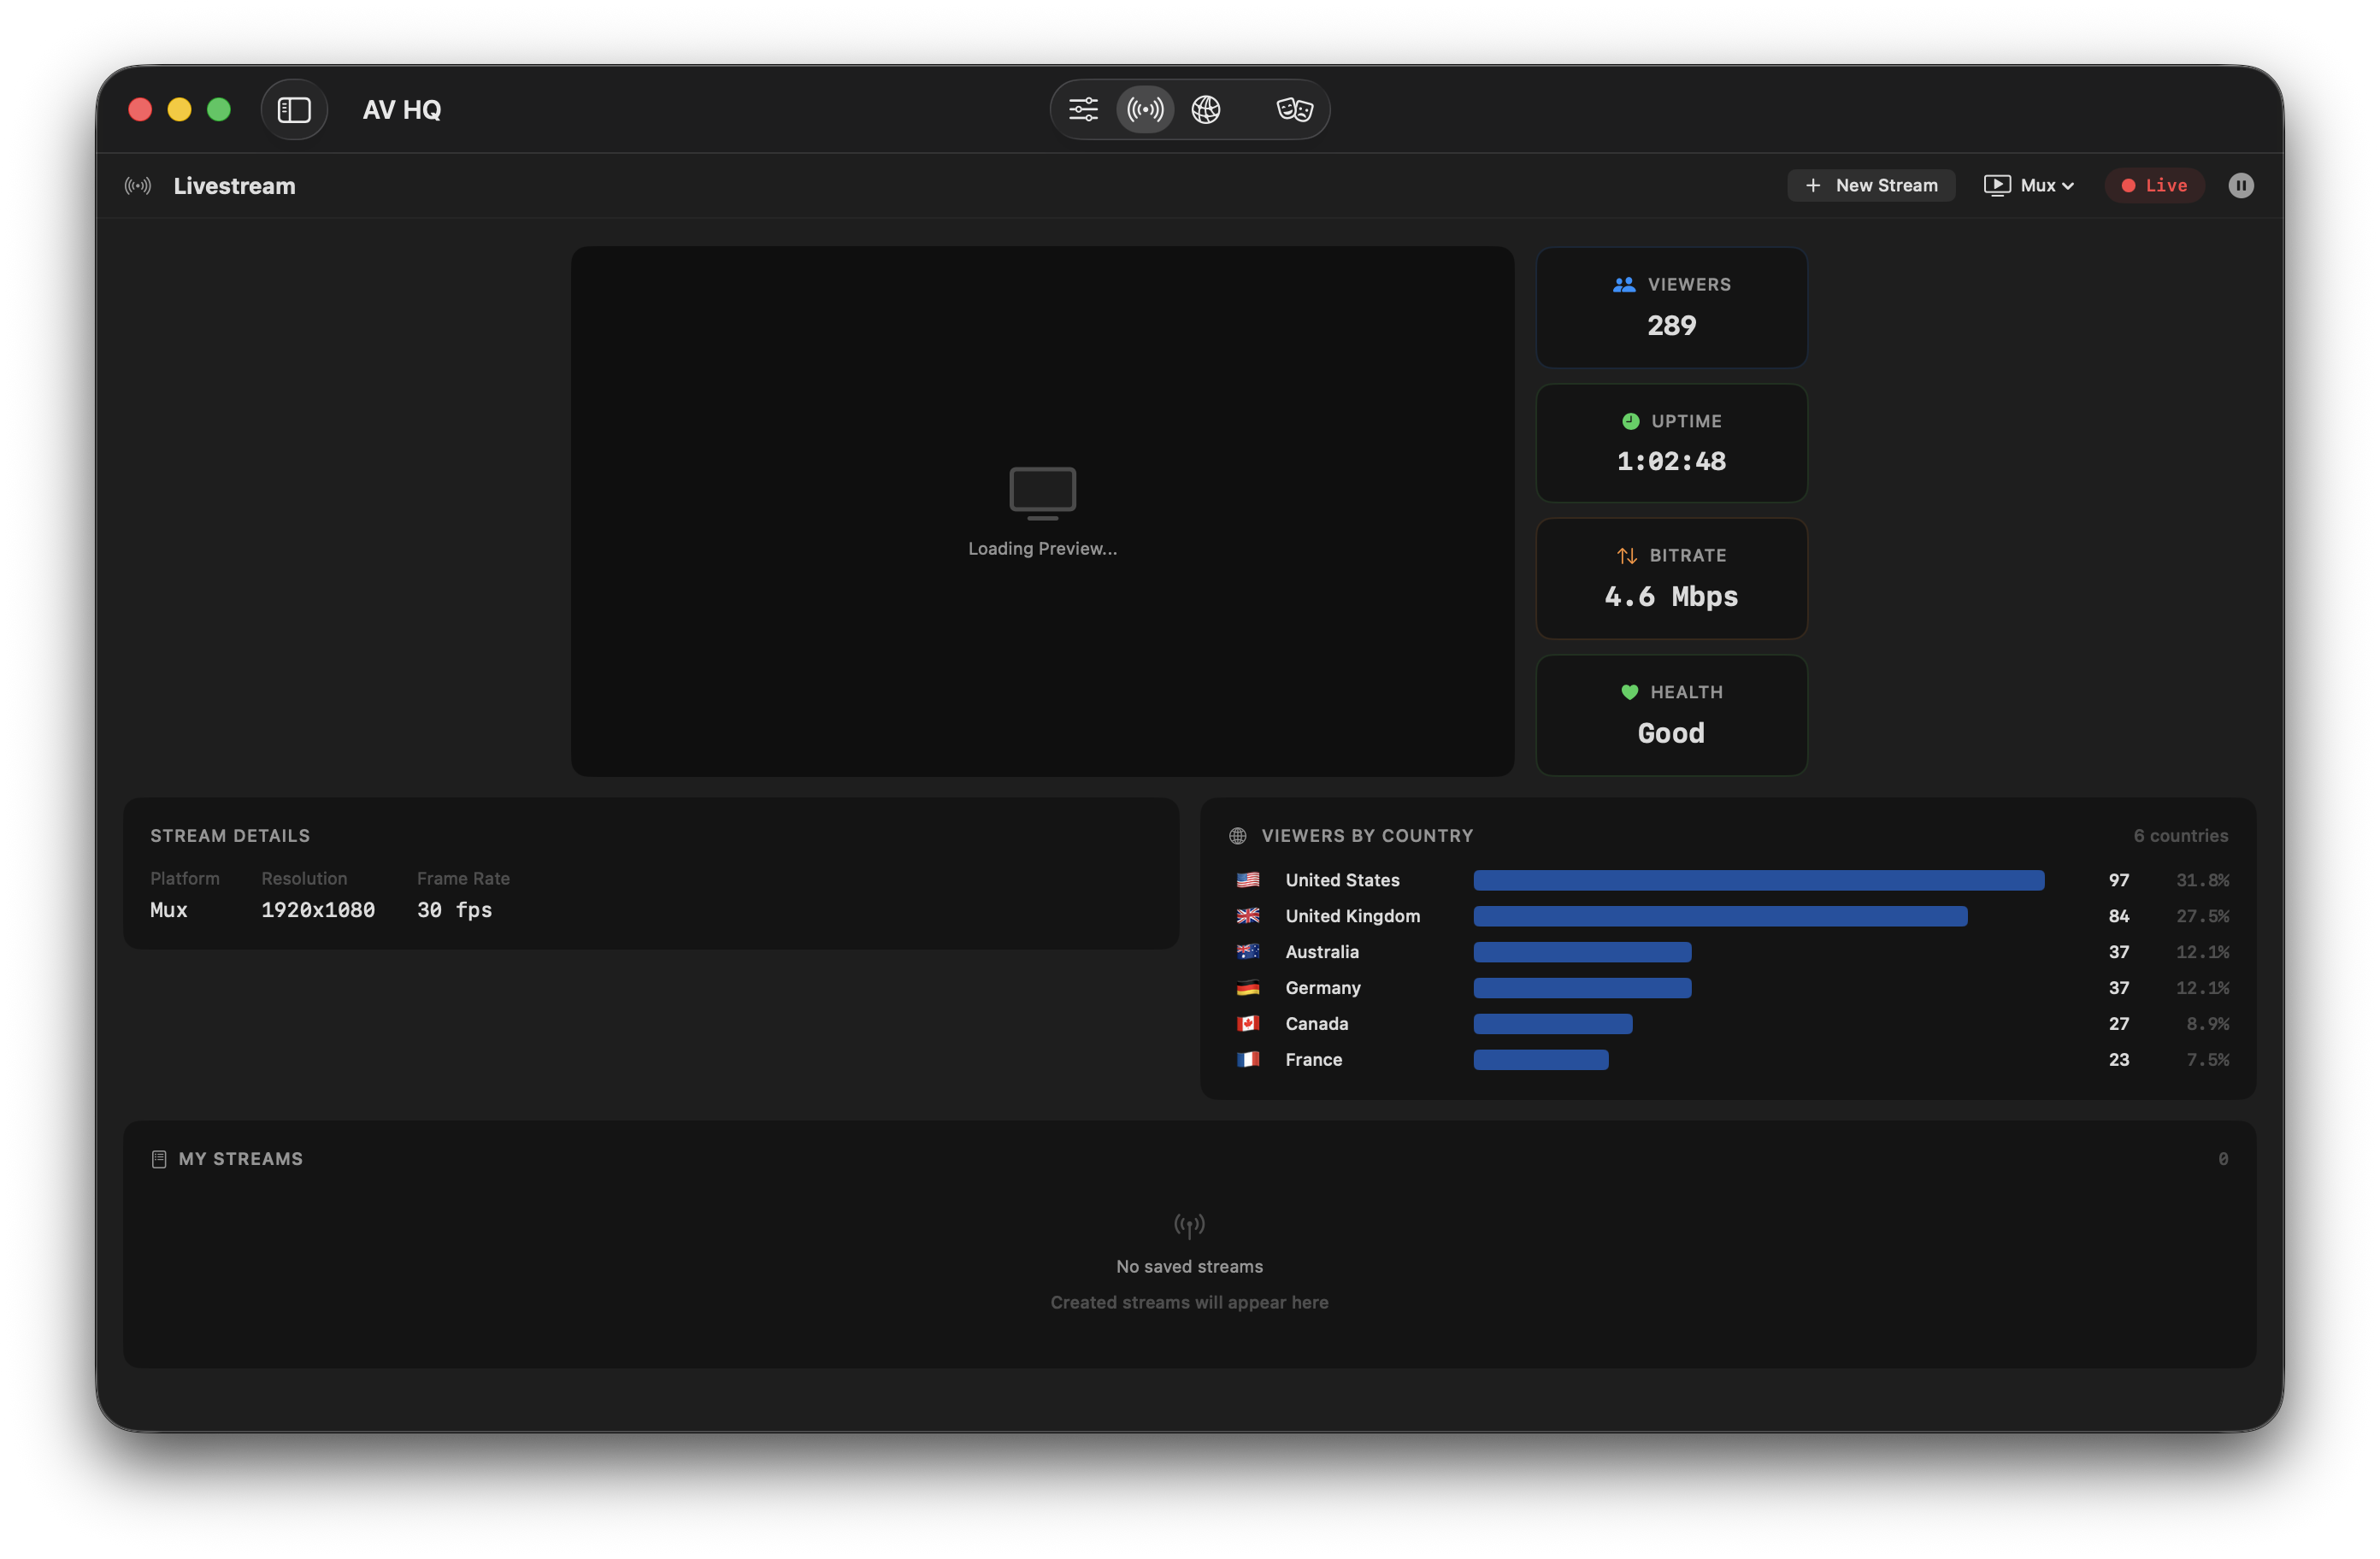
- Live status: Whether your stream is currently active or offline
- Concurrent viewers: Real-time viewer count
- Uptime: How long the stream has been live
- Bitrate: Current stream bitrate
- Health: Overall stream health indicator (Good, Fair, Poor)
- Viewers by country: Geographic breakdown showing which countries your viewers are watching from, with flag indicators and proportional charts
- Stream details: Platform, resolution, and frame rate
A compact version of the livestream status also appears in Show Mode's toolbar, so you can keep an eye on your stream without leaving the production view.
Keyboard Shortcuts
| Action | Shortcut |
|---|---|
| Switch to camera 1–9 | 1 – 9 |
| Previous camera | [ |
| Next camera | ] |
| Last camera (toggle) | ` |
| Toggle fine-tune mode | F |
| Pan / Tilt | Arrow keys |
| Zoom in / out | + / - |
| Stop all movement | Space |
| Control mode | Cmd+1 |
| Livestream mode | Cmd+2 |
| Network mode | Cmd+3 |
| Show Mode | Cmd+4 |
Troubleshooting
Cameras not appearing
- Ensure your Mac and cameras are on the same network and subnet
- Check that NDI is enabled on your camera (refer to your camera's manual)
- Verify your firewall is not blocking NDI traffic (TCP/UDP port 5353 for mDNS, plus NDI's dynamic ports)
- Try a wired Ethernet connection — Wi-Fi can sometimes block mDNS discovery
- Restart the app to trigger a fresh discovery scan
No video preview
- AV HQ currently supports one active video preview at a time. Select the camera you want to view in the sidebar
- Ensure the NDI source is actively transmitting video
- Check that no other application has an exclusive lock on the NDI source
Dante devices not found
- Dante discovery uses mDNS (Bonjour). Ensure mDNS traffic is not blocked on your network
- Verify your Dante devices are powered on and connected to the same network
- Some managed switches may block mDNS — check your switch configuration
Livestream data not updating
- Verify your API credentials are correct in Settings
- Check that your stream is active on the platform
- Mux data updates every few seconds — allow a moment after going live
Contact Support
If you need help with AV HQ, we're here for you.